I used to think WordPress speed optimization was one of those “nice to have, do it eventually” tasks. Then I ran a PageSpeed Insights test on my main affiliate site and watched my mobile score come back at 38 out of 100.
Thirty-eight. On a blog I was actively sending paid traffic to.
That number is basically Google telling you, politely, “most of your visitors are giving up before your page even finishes loading.” And if you’re running affiliate links, a comparison table, or a dropshipping storefront, every one of those abandoned visitors is a commission that never had a chance to happen.
So I spent a weekend fixing it properly. Here’s the exact checklist — not generic “install a caching plugin” advice, but the specific order of operations that actually moved the needle, on the same lightweight theme foundation we covered in our free WordPress themes guide.
Why Speed Matters More for Affiliate & Dropshipping Sites Specifically
Before the checklist, a quick reality check on why this deserves a whole afternoon of your time:
- Every second of delay measurably drops conversions. On a content site, that's fewer email signups. On an affiliate or dropshipping page, that's fewer completed purchases through your links.
- Core Web Vitals are a ranking factor. Google explicitly factors page experience metrics into search rankings — a slow site is competing at a structural disadvantage before content quality even enters the picture.
- Mobile traffic dominates. If you're not testing on mobile specifically (not just desktop), you're optimizing for a shrinking share of your actual audience.
- AI search tools crawl for speed too. Faster, cleaner-loading pages are easier for crawlers — including the ones powering AI-driven answer engines — to fully render and index, which matters if you want your content cited, not just ranked.
Okay. Let's fix it.
Step 1: Get Your Baseline Score First
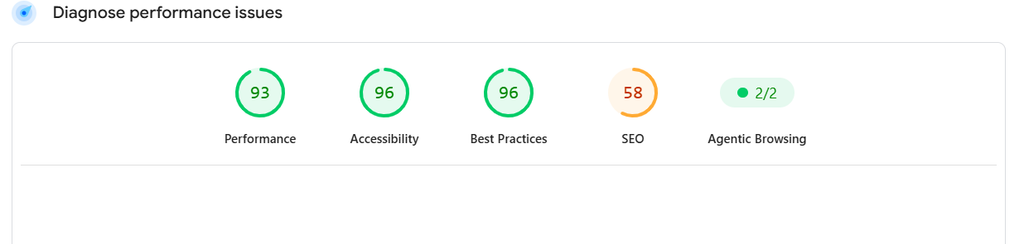
Don't skip this. Run your homepage and your top-performing affiliate post through Google's PageSpeed Insights tool and write down both your mobile and desktop scores, plus the specific Core Web Vitals flags it raises (usually Largest Contentful Paint, Cumulative Layout Shift, or Total Blocking Time).
You need this baseline so you can actually measure whether each step below is helping — optimizing blind is how people waste a weekend installing five plugins that fight each other.
Step 2: Choose (or Confirm) a Lightweight Theme
If you're still on a bloated multipurpose theme from a marketplace, this is non-negotiable — fix it before touching anything else. Everything downstream compounds on top of your theme's base weight.
We've already covered this in depth in two posts:
If you're on GeneratePress, Astra, or a similarly lean theme already, you can skip ahead — but confirm you haven't accidentally installed a heavy page builder plugin running alongside it that's quietly undoing that advantage.
Step 3: Install One Caching Plugin (Not Three)
This is the single highest-impact, lowest-effort fix on this whole list. A caching plugin serves pre-built static versions of your pages instead of rebuilding them from the database on every single visit.
Pick exactly one:
- WP Rocket (paid) — the easiest setup, does most of the heavy lifting automatically, worth it once your site is earning
- LiteSpeed Cache (free) — excellent if your host runs LiteSpeed servers
- WP Super Cache or W3 Total Cache (free) — solid budget options, slightly more manual configuration
Running more than one caching plugin at once doesn't stack benefits — it causes conflicts. Pick one and fully configure it.
Step 4: Compress Every Image Before It Ever Gets Uploaded
Unoptimized images are, by a wide margin, the most common cause of slow affiliate blogs — because affiliate content is inherently visual. Product photos, comparison screenshots, review images.
The fix:
- Run images through a compressor (ShortPixel, TinyPNG, or your caching plugin's built-in optimizer) before uploading
- Convert to WebP format where possible — it's meaningfully smaller than JPEG or PNG at equivalent visual quality
- Set explicit width and height attributes on images so the browser reserves space before the image loads, which prevents the layout-shift penalty that hurts your Core Web Vitals score
Step 5: Enable Lazy Loading
Lazy loading defers offscreen images and embeds from loading until a visitor actually scrolls near them. WordPress core has included native lazy loading since version 5.5, so in many cases this is already partially active — but confirm your theme and caching plugin aren't disabling it, and consider extending it to embedded videos and iframes too, since those are often missed.
Step 6: Audit Your Plugins Ruthlessly
Every plugin you install adds its own CSS, JavaScript, and sometimes database queries — whether you're actively using its features on a given page or not.
Do this audit:
- List every active plugin
- For each one, ask: "Am I actually using this, or did I install it once and forget about it?"
- Deactivate and delete anything you can't justify
- For plugins you're keeping, check if they offer a way to disable their scripts on pages that don't need them (many form and popup plugins support this)
I found three abandoned plugins on my own site during this exact audit — one was a page builder I'd switched away from a year earlier but never uninstalled, still silently loading its full script library sitewide.
Step 7: Minify and Combine CSS/JavaScript
Most caching plugins include this as a built-in option — it strips unnecessary whitespace and comments from your CSS/JS files and can combine multiple files into fewer requests. Enable it, then re-test your site thoroughly, since aggressive minification occasionally breaks a poorly coded plugin's script. If something looks broken after enabling it, that's usually the cause.
Step 8: Use a Content Delivery Network (CDN)
A CDN serves your static assets (images, CSS, JS) from servers geographically closer to each visitor, instead of a single server location. Cloudflare's free tier is the standard starting point here and pairs well with any of the caching plugins above.
Step 9: Upgrade Your Hosting If You've Outgrown It
This is the step people avoid because it costs money, but if you're on a $3/month shared hosting plan and sending real affiliate traffic to your site, you've likely outgrown it. Signs it's time to upgrade:
- Your site slows down noticeably during traffic spikes
- Your host's support keeps blaming "too many resources" for slow load times
- You're already doing everything above and still can't break into a good PageSpeed range
Managed WordPress hosting (built specifically for WordPress, with server-level caching already optimized) tends to outperform generic shared hosting by a wide margin for the same monthly price range.
Step 10: Re-Test and Track Over Time
Run PageSpeed Insights again after each major change, not just once at the end — this tells you which specific step actually moved your score, so you're not guessing next time something slows down.
Set a recurring check every month or two, especially after adding new plugins, a new comparison-table tool, or a redesign. Speed optimization isn't a one-time task — it's a habit that quietly protects the rankings and conversions you've already earned.
Quick-Reference Checklist
- Baseline PageSpeed score recorded (mobile + desktop)
- Lightweight theme confirmed (GeneratePress, Astra, or similar)
- One caching plugin installed and configured
- All images compressed and converted to WebP where possible
- Lazy loading active on images, video embeds, and iframes
- Plugin list audited and trimmed
- CSS/JS minification enabled and tested
- CDN connected (Cloudflare or similar)
- Hosting reviewed against current traffic levels
- Recurring speed check scheduled
Final Thoughts
That 38-out-of-100 site I mentioned at the start? After working through this exact list — theme swap, one caching plugin, image compression, and a plugin audit — it landed in the low 90s on mobile within a weekend, no hosting upgrade required. Rankings for two of my review posts noticeably improved within about a month, and the bounce rate on my highest-traffic comparison page dropped in a way I could actually see in Analytics.
Speed optimization isn't glamorous content — nobody dreams about compressing images on a Saturday. But of everything covered across this cluster, it's the step most likely to quietly be costing you traffic and commissions right now, today, without you realizing it.
FAQs
How often should I re-check my site speed?
Every month or two at minimum, and always immediately after installing a new plugin, switching themes, or adding a new heavy feature like a comparison-table tool or popup builder.
Do I need paid tools like WP Rocket, or can I get good results for free?
You can absolutely get strong results with free tools — LiteSpeed Cache, a free image compressor, and Cloudflare's free CDN tier cover the majority of the impact. Paid tools mainly save setup time and offer more granular control, not access to fundamentally different techniques.
Will speed optimization alone fix my rankings?
No — speed is one ranking factor among many, and it won't compensate for thin or low-quality content. Think of it as removing a ceiling on your potential rankings, not a replacement for the content and link-building work covered elsewhere in this cluster.